How to create your first frontend to interact with smart contract

I am a self taught developer from Nigeria. A software engineer, technical writer and a fish technologist in making. I love diversity and always available to learning and acquiring new knowledge
In this tutorial I will show you step-by-step how to create your first front-end to interact with a smart contract deployed at RSK local network, using only JavaScript and HTML and connected to a wallet using a web3 provider.
Overview
Below is the summary of the steps to be taken to build our front-end:
- Configure Meta mask to connect to RSK testnet;
- Get some testnet RBTCs at faucet;
- Connect Remix with RSK Testnet;
- Create, compile and deploy a smart contract on RSK Testnet using Remix;
- Initialize the project;
- Install web3.js;
- Create a JavaScript file;
- Create a html file;
- Install and run a local server;
- Interact with the smart contract.
Steps 1 to 4 are explained in detail in the tutorial link below: • using Remix and Meta mask with RSK testnet
Requirements
• Meta mask
• Remix - web tool, online
• Node.js and NPM (Node Package Manager)
• Visual Studio Code (VSCode) or any other text editor of your choice
• HTTP server: Express
• Web3.js
As earlier mentioned, to install Meta mask and connect to RSK testnet and to connect Remix with RSK Testnet are explained in detail in the tutorial link below:
• using Remix and meta mask with RSK testnet
Node.js and NPM
Node.js and NPM are needed, though both are usually installed at once.
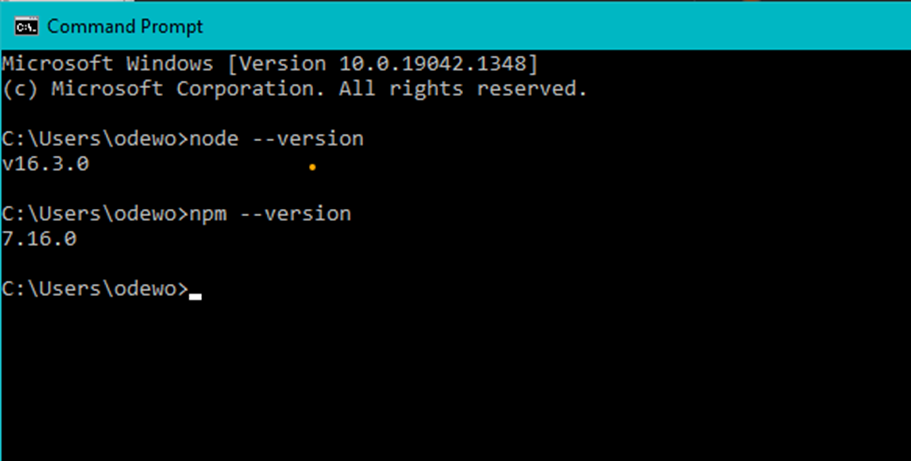
NB: To check if Node.js and NPM is already installed, input the following commands in the terminal:
node --version
npm –version
Go to Node.js if you need to install it.
Visual Studio Code (VSCode)
In this tutorial, we would use VSCode to create and deploy our project. To use VSCode download it here .
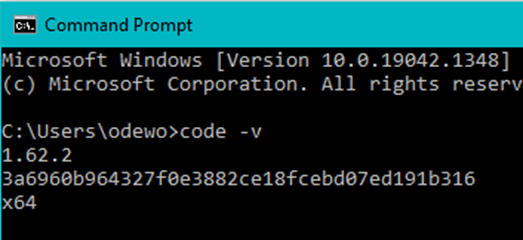
Verify if your VS code installation was successful by typing the following command into the terminal:
code -v
Create the Register project
Create a folder named Register, and start a npm project in the Register folder by typing the following commands below into the terminal:
mkdir Register
cd Register
npm init -y
For example, I will create a folder at this location -
C:\Users\odewo
My project can be located in the folder
C:\Users\odewo\Register
Express
Express is a Node.js web application framework that helps to develop web applications. It is a minimalist HTTP server.
To install Express, input the command below into the terminal and press enter at your project location:
npm install express --save
More info:
• https://expressjs.com/
• https://www.npmjs.com/package/express
Web3.js
Web3.js helps us to develop websites or clients that interact with the blockchain - writing code that reads and writes data from the blockchain with smart contracts.
Web3.js is a collection of libraries that allow you to interact with a local or remote ethereum node using HTTP, IPC or WebSocket. The web3.js library is an Ethereum Javascript API which connects using the generic JSON-RPC spec. As RSK’s virtual machine implementation is compatible with the Ethereum Virtual Machine (EVM), it is possible to use web3.js to interact with the front end and the RSK local node.
To install web3.js, input the command below into the terminal and press enter at your project location:
npm install web3 --save
More info:
• https://web3js.readthedocs.io/
Check package.json
package.json is a file created by npm with some configurations, including the packages which we installed before using the command npm init -y.
After the installations, I will open the project folder named Register in VSCode and verify the file package.json. Let’s take a look at the dependencies in the file:
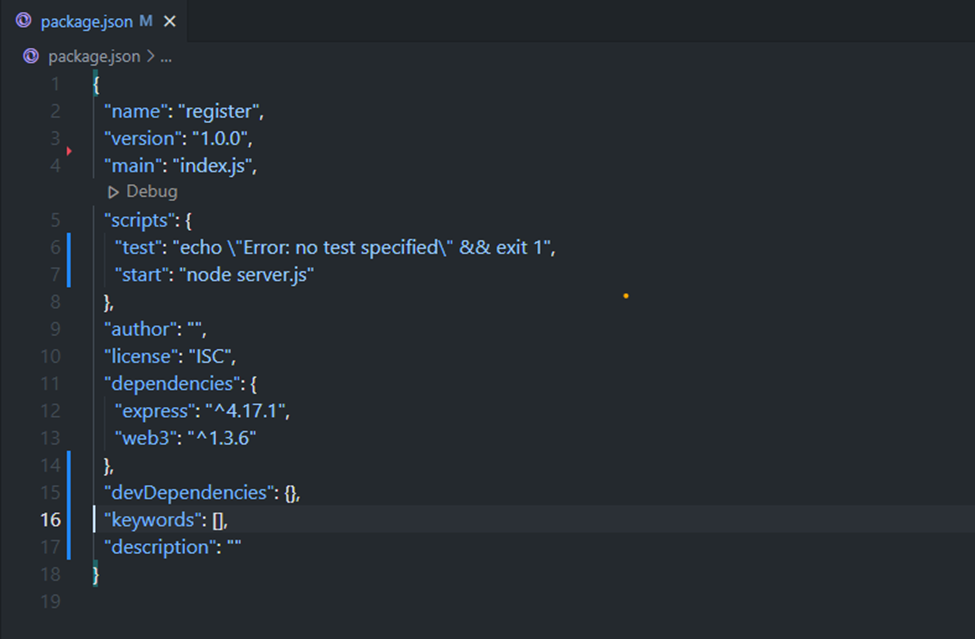
You will find the previously installed packages:
"dependencies": {
   "express": "^4.17.1",
   "web3": "^1.3.6"
 }
Deploy a smart contract
This is explained in detail in the tutorial:
• using Remix and Metamask with RSK testnet
We’ll do the relevant parts of that tutorial here.
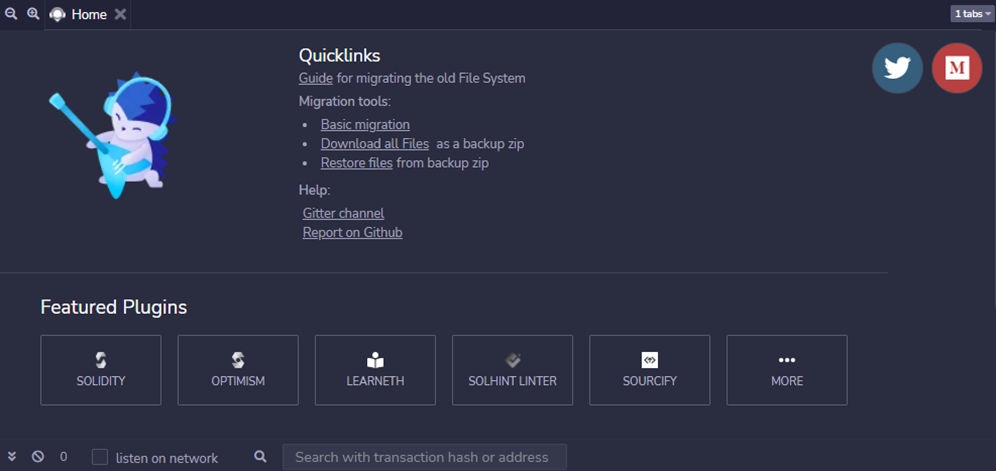
Remix
Go to http://remix.ethereum.org/
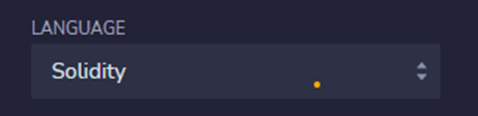
NB: Be sure to click the Solidity button under Environment, as seen in the image above.
We need this in order to compile our smart contract as our code is written in the Solidity language.
Create a smart contract
Create a new file
File name: Register.sol
Copy and paste the smart contract from the following gist, or copy and paste the code below:
pragma solidity 0.5.4;

contract Register {
    string private info;

    function setInfo(string memory _info) public {
        info = _info;
    }

    function getInfo() public view returns (string memory) {
        return info;
    }
}
Register.sol
This smart contract has:
• A variable info to store a string.
• A function getInfo() to return the string stored at variable info.
• A function setInfo() to change the string stored at variable info.
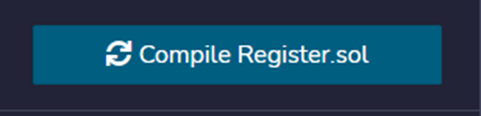
Compile a smart contract
In the 3rd button at the left side select Solidity compiler.
Click the button Compile Register.sol.
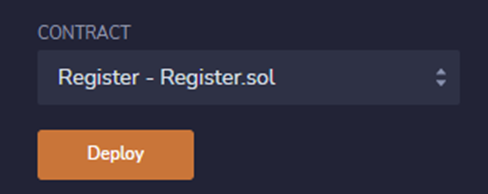
Deploy a smart contract
In the left side panel, go to the button Deploy and run transactions.
Under Environment, make sure you have selected the Injected Web3 option, as this tells Remix to use the Web3 provider injected by a browser plugin such as MetaMask or Nifty.
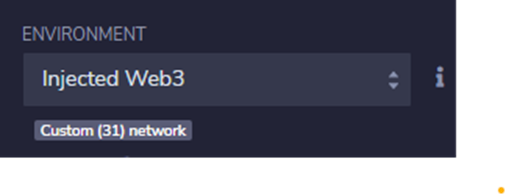
Then click the button Deploy.
Ensure that you have tRBTC in your wallet, as this is needed to pay gas fees when deploying the smart contracts. To do so, please follow this guide: Using Remix and Metamask with RSK testnet .
When a smart contract is deployed with Remix, we can see it in the left panel under deploy and run transactions.
Click on the copy button at the right side of the smart contract to copy the address of the smart contract. We will need it for use on the front end.
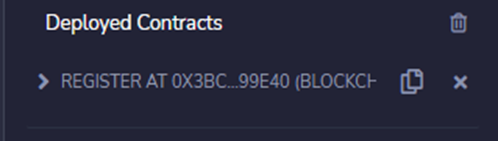
In my example, the contract address is 0xc864D0fef177A69aFa8E302A1b90e450910A4c3E
Client-Side Application - The front end
Now let’s start building out the front end that will interact with the smart contract.
We have only 2 files in the front end:
- index.html
- index.js
Index.html
In Register folder, create a file named index.html.
Copy and paste the HTML from the following gist, or copy and paste the code below:
https://github.com/Tundesamson26/smart-contract-blockchain/blob/master/index.js
    // Source code to interact with smart contract

// web3 provider with fallback for old version
window.addEventListener('load', async () => {
  // New web3 provider
  if (window.ethereum) {
      window.web3 = new Web3(ethereum);
      try {
          // ask user for permission
          await ethereum.enable();
          // user approved permission
      } catch (error) {
          // user rejected permission
          console.log('user rejected permission');
      }
  }
  // Old web3 provider
  else if (window.web3) {
      window.web3 = new Web3(web3.currentProvider);
      // no need to ask for permission
  }
  // No web3 provider
  else {
      console.log('No web3 provider detected');
  }
});
console.log (window.web3.currentProvider)

// contractAddress and abi are setted after contract deploy
var contractAddress = '0xc864D0fef177A69aFa8E302A1b90e450910A4c3E';
var abi = JSON.parse( '[{"constant":true,"inputs":[],"name":"getInfo","outputs":[{"name":"","type":"string"}],"payable":false,"stateMutability":"view","type":"function"},{"constant":false,"inputs":[{"name":"_info","type":"string"}],"name":"setInfo","outputs":[],"payable":false,"stateMutability":"nonpayable","type":"function"}]' );

//contract instance
contract = new web3.eth.Contract(abi, contractAddress);

// Accounts
var account;

web3.eth.getAccounts(function(err, accounts) {
  if (err != null) {
    alert("Error retrieving accounts.");
    return;
  }
  if (accounts.length == 0) {
    alert("No account found! Make sure the Ethereum client is configured properly.");
    return;
  }
  account = accounts[0];
  console.log('Account: ' + account);
  web3.eth.defaultAccount = account;
});

//Smart contract functions
function registerSetInfo() {
  info = $("#newInfo").val();
  contract.methods.setInfo (info).send( {from: account}).then( function(tx) {
    console.log("Transaction: ", tx);
  });
  $("#newInfo").val('');
}

function registerGetInfo() {
  contract.methods.getInfo().call().then( function( info ) {
    console.log("info: ", info);
    document.getElementById('lastInfo').innerHTML = info;
  });
}
This part connected to RSK Local node using the wallet injected, in our case, Metamask:
// web3 provider with fallback for old version
window.addEventListener('load', async () => {
  // New web3 provider
  if (window.ethereum) {
      window.web3 = new Web3(ethereum);
      try {
          // ask user for permission
          await ethereum.enable();
          // user approved permission
      } catch (error) {
          // user rejected permission
          console.log('user rejected permission');
      }
  }
  // Old web3 provider
  else if (window.web3) {
      window.web3 = new Web3(web3.currentProvider);
      // no need to ask for permission
  }
  // No web3 provider
  else {
      console.log('No web3 provider detected');
  }
});
Update index.js
Did you remember the address of the smart contract that you copied after deploying it? It will be updated here:
var contractAddress = '0xc864D0fef177A69aFa8E302A1b90e450910A4c3E';
HTML server
In the Register folder, create a file named server.js.
var express = require('express');
var app = express();
app.use(express.static(__dirname));
app.listen('3300');
console.log('Running at\http://localhost:3100');
This file configures the express HTML server.
Run Server
The last step is to execute the express server. Input the command below into the terminal.
node server.js
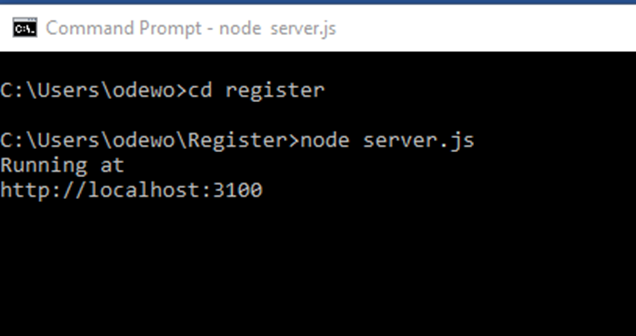
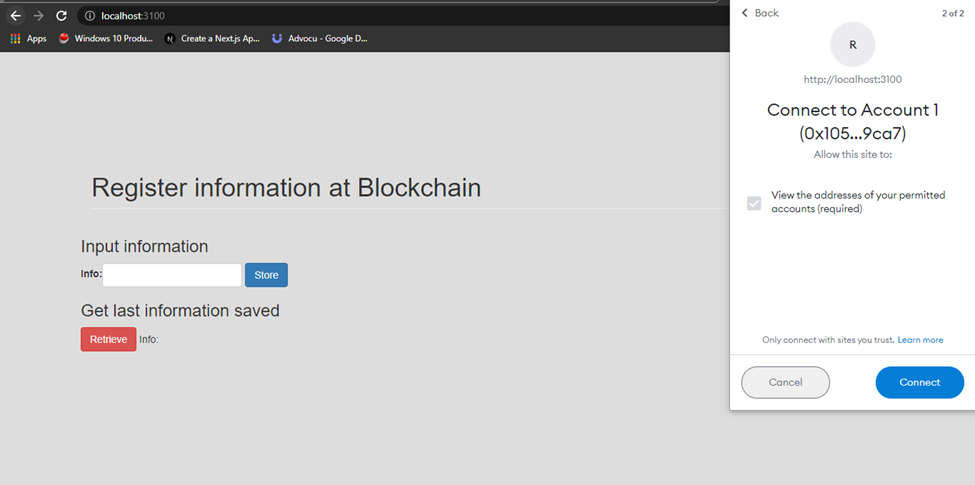
In your browser, go to:
http://localhost:3100
Click on the Connect button when the Metamask Wallet pops up
Interact with the smart contract
Retrieve
Click on the Retrieve button.
The web3 instance will call the setInfo() function on the register smart contract instance, with the info that you entered into the text field.
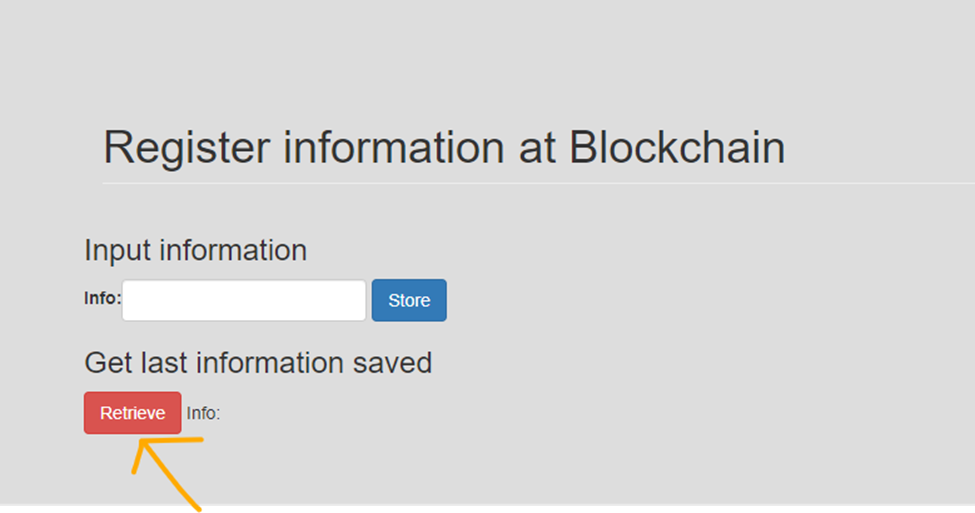
We do not have any information stored, because we did not specify an initial value in the smart contract
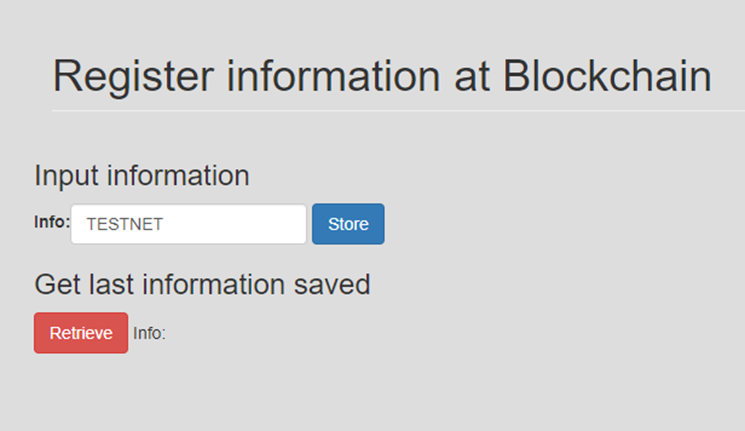
Store
Enter any value in the info text field, and click on the Store button. The web3 instance would call the setInfo() function at the smart contract instance register, with the info that you defined.
I will enter the value “TESTNET”.
Wait a few seconds for the transaction to be included in a block…
getInfo (again)
Now we have the value “TESTNET” saved, and we can check it.
Click on the Retrieve button again
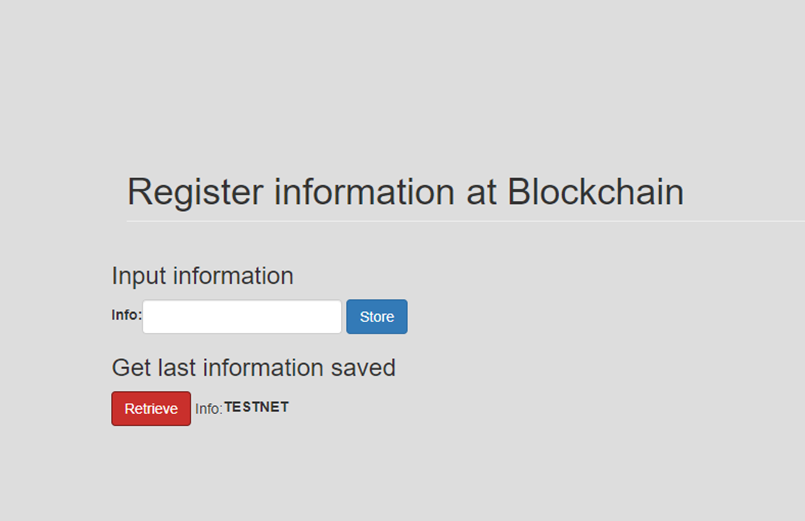
And it returned the info “TESTNET”.
Great! Now we have an information stored in our smart contract, and we can retrieve it!
**Note
We have a smart contract with a public function that has no restrictions about who is allowed to call it, but that’s just for demonstration purposes. In a real-world smart contract, such checks would be performed in any functions that alter the smart contract state.**
Congratulations!
You have successfully built and deployed your first decentralized application (DApp) powered by RSK smart contracts!
You can download the full source code to this tutorial here:
https://github.com/Tundesamson26/smart-contract-blockchain
Satisfied with this tutorial? I’d appreciate your feedback and you can share it.....


